


Recently, another GT member posted the following link in a General Glocking thread:
http://www.brianenos.com/forums/index.php?showtopic=52311&hl=trigger&st=0
The link is a thread in Brian's Forums in which a guy named Joe D (who incidentally lives in the same city as I do) describes how companies like Vanek and the like achieve such sweet Glock trigger pulls. Basically, you remove the trigger pad from the trigger bar, and drill new holes in the pad and bar. By relocating the pad higher and further forward on the bar, you get more mechanical advantage, a lighter pull, a better reset, less over-travel, and you can actually tune your trigger to your liking.
I decided to try the modification on my G21SF. My first attempt ended in semi-failure. It was an improvement, but had issues. So, I ordered four more trigger bars, and just finished getting it right. It takes some trial and error, but is REALLY worth the effort. If the stock trigger is 5.5lbs, mine is now 2.5lbs at the most. The pre-travel is maybe reduced a tad, the over-travel is almost gone, the break is still crisp, the pull is smooth, and the reset is not weak and spongy like with lighter connectors/springs.
I already have a thread about this in General Glocking, but it pretty quickly turned into a debate on why one should or should not have a light trigger. I figured you guys might appreciate it more.
Original thread:
http://glocktalk.com/forums/showthread.php?t=1368021
Here is how to do it:
1. Remove the trigger pad from trigger bar. To do this, you have to make a hole in the right side of the trigger so you can push the pin out (the top, metal pin, not the lower, plastic pin which holds on the trigger safety). If you tap on the pin, it will bulge the right side of the trigger, and you can get an idea of its location. Then drill a hole, and push it out. DO NOT just try to hammer it out. Doing so will break the whole right side of the trigger pad.
2. Drill a new hole in the trigger pad. You want to drill a hole up and to the right of the original (if looking at left side). The new hole should be .130" (measuring center to center) from the original, and should be 5/64" in diameter. See pictures below for location. Location of this hole is CRITICAL. Expect to mess up at least 1-2 pads. It took me three tries to get right. You can also tune your trigger to your liking by adjusting this. Drill the hole further to the rear, and pre-travel will be reduced. Drill closer to the front, and over-travel will be reduced. However, if you go too far in either direction, it will result in the loss of function of something (either safety function or firing function). Also, make sure your hole is STRAIGHT. Drilling from the right is actually better, since the right side is more important. The trigger attaches on the right side, so if your hole is not straight (like my first), it will really affect the trigger bar placement.
3. Drill a new hole in the trigger bar. Now, you want to drill a new hole in the trigger bar .130-.140" up the trigger bar (it should be centered). Joe D said to use .120" for "older" trigger bars. I'm not sure what makes one "older", but I used the "newer" .140" measurement. This is the hard part. The trigger bar is VERY hard to drill through. You will use the same 5/64" drill bit here, but expect to use up several. I used a DeWalt titanium split tip (2 actually), and Rigid cobalt bits. Once you get through the outer coating, the bit will cut right through.
4. Trim the bar. Now you have to trim the excess off the trigger bar. This is a simple affair with a Dremel and a cut-off wheel. It doesn't need to be special or pretty, just chop off the old hole, so it fits in the trigger pad.
5. OPTIONAL: Bend trigger spring tab forward. Joe D says to do this, and it should lighten the pull further (he claims to have gotten Glock pulls down to 14oz. after much experimentation). I found no need to go lighter, as mine is easily in the 2-2.5lb range already. Since this process sets the trigger bar further back at rest, bending the trigger spring tab forward (the bottom tab on trigger bar, under sear, where trigger spring attaches) gets the spring tension back up to normal. If you do this, you MUST heat the bar until a dull red while bending, or it WILL snap. I did not bother with this.
6. Reassemble and enjoy!
This really works, and makes the stock trigger feel great. You get none of the undesirable side effects of lighter connectors/springs, such as mushy break, weak reset, etc. It will take some luck, and trial and error, but for the cost of 3-4 trigger bars ($35-50), you get a GREAT trigger. If you get really lucky, you could do this for free if you have the tools. It cost me $24, since I messed up my first and second. I nailed it on the third.
Here are some pics:
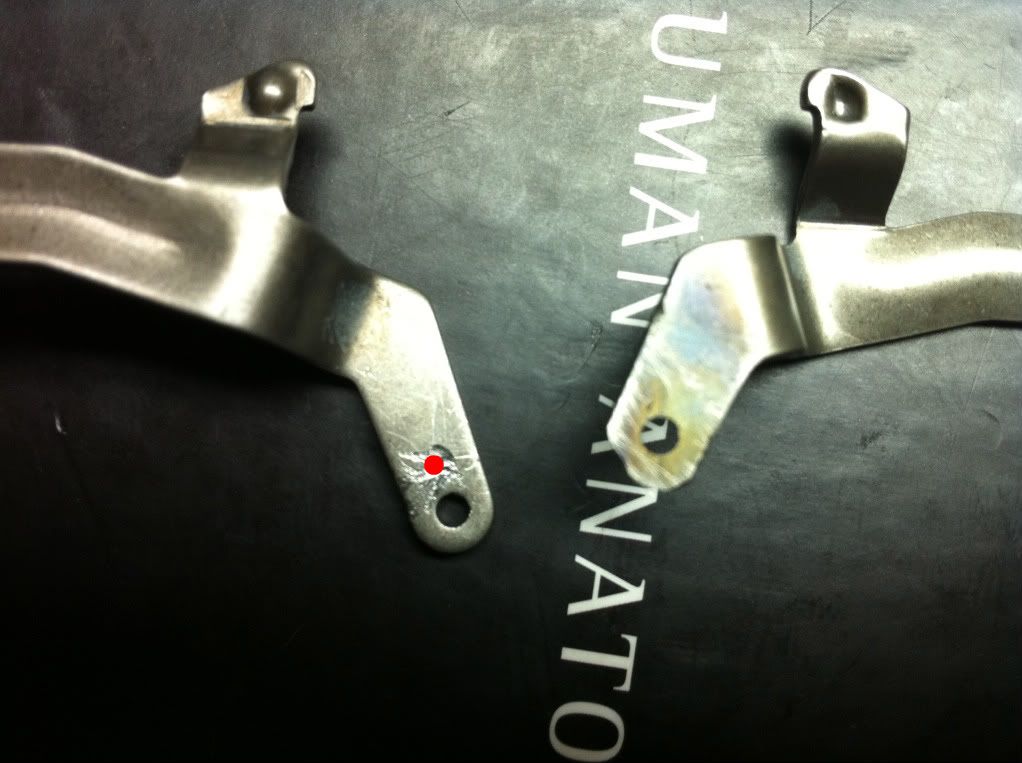
These first two pictures are of the trigger bar hole. The first picture shows the modified bar on top of the stock bar. I know the cut off edge looks like crap, but I was anxious to test it, and you can't see it. It's fine like it is.
![Image]()
I forgot to take a picture before I cut off the end of the trigger bar (and the original hole), so I took this one. Stock is left, modified right. On the stock bar, you can see a mark where I started to drill a hole. I did that so you could see where to drill. It is about .130-.140" from the original (measure center to center). The heat discoloration is NOT from drill bit friction. It barely gets hot during drilling. That was from me heating it with a torch. My bits were dull, I was frustrated, my arms were tired, and I got desperate. It did nothing.
![Image]()
Here is the one that finally worked. The distance from the original hole (lower left hole) to the new hole (upper right) is about .130" measuring center to center.
![Image]()
The top one is the good one. The bottom is my original. Notice how my original was too far rearward, and too low. It pulled the trigger bar down too far, and would not deactivate the striker safety. Depending on where you drill the hole in the pad, you can get certain features. Further to the rear should reduce pre-travel, toward the front should reduce over-travel, etc.
![Image]()
Here's a shot of the right side of the pads. Again, the good one is on the top, original on bottom. It is hard to get the pin out without somewhat chewing up the plastic. I am going to fill the holes in with epoxy. Again, notice pin placement. One of the main problems with my original (bottom) was that my hole was not straight. It was lower on this side (right side), and the right side is more important since the trigger bar attaches on this side. Again, being so low prevented the striker safety from deactivating during the pull.
![Image]()
Here are all three pads. From bottom up, first, second and third. The top is the correct placement. The middle pad was too far forward, and the striker would not release. It was also too high, though that may not have been a problem. If you do this, just try to replicate the top one as best as possible.
![Image]()
http://www.brianenos.com/forums/index.php?showtopic=52311&hl=trigger&st=0
The link is a thread in Brian's Forums in which a guy named Joe D (who incidentally lives in the same city as I do) describes how companies like Vanek and the like achieve such sweet Glock trigger pulls. Basically, you remove the trigger pad from the trigger bar, and drill new holes in the pad and bar. By relocating the pad higher and further forward on the bar, you get more mechanical advantage, a lighter pull, a better reset, less over-travel, and you can actually tune your trigger to your liking.
I decided to try the modification on my G21SF. My first attempt ended in semi-failure. It was an improvement, but had issues. So, I ordered four more trigger bars, and just finished getting it right. It takes some trial and error, but is REALLY worth the effort. If the stock trigger is 5.5lbs, mine is now 2.5lbs at the most. The pre-travel is maybe reduced a tad, the over-travel is almost gone, the break is still crisp, the pull is smooth, and the reset is not weak and spongy like with lighter connectors/springs.
I already have a thread about this in General Glocking, but it pretty quickly turned into a debate on why one should or should not have a light trigger. I figured you guys might appreciate it more.
Original thread:
http://glocktalk.com/forums/showthread.php?t=1368021
Here is how to do it:
1. Remove the trigger pad from trigger bar. To do this, you have to make a hole in the right side of the trigger so you can push the pin out (the top, metal pin, not the lower, plastic pin which holds on the trigger safety). If you tap on the pin, it will bulge the right side of the trigger, and you can get an idea of its location. Then drill a hole, and push it out. DO NOT just try to hammer it out. Doing so will break the whole right side of the trigger pad.
2. Drill a new hole in the trigger pad. You want to drill a hole up and to the right of the original (if looking at left side). The new hole should be .130" (measuring center to center) from the original, and should be 5/64" in diameter. See pictures below for location. Location of this hole is CRITICAL. Expect to mess up at least 1-2 pads. It took me three tries to get right. You can also tune your trigger to your liking by adjusting this. Drill the hole further to the rear, and pre-travel will be reduced. Drill closer to the front, and over-travel will be reduced. However, if you go too far in either direction, it will result in the loss of function of something (either safety function or firing function). Also, make sure your hole is STRAIGHT. Drilling from the right is actually better, since the right side is more important. The trigger attaches on the right side, so if your hole is not straight (like my first), it will really affect the trigger bar placement.
3. Drill a new hole in the trigger bar. Now, you want to drill a new hole in the trigger bar .130-.140" up the trigger bar (it should be centered). Joe D said to use .120" for "older" trigger bars. I'm not sure what makes one "older", but I used the "newer" .140" measurement. This is the hard part. The trigger bar is VERY hard to drill through. You will use the same 5/64" drill bit here, but expect to use up several. I used a DeWalt titanium split tip (2 actually), and Rigid cobalt bits. Once you get through the outer coating, the bit will cut right through.
4. Trim the bar. Now you have to trim the excess off the trigger bar. This is a simple affair with a Dremel and a cut-off wheel. It doesn't need to be special or pretty, just chop off the old hole, so it fits in the trigger pad.
5. OPTIONAL: Bend trigger spring tab forward. Joe D says to do this, and it should lighten the pull further (he claims to have gotten Glock pulls down to 14oz. after much experimentation). I found no need to go lighter, as mine is easily in the 2-2.5lb range already. Since this process sets the trigger bar further back at rest, bending the trigger spring tab forward (the bottom tab on trigger bar, under sear, where trigger spring attaches) gets the spring tension back up to normal. If you do this, you MUST heat the bar until a dull red while bending, or it WILL snap. I did not bother with this.
6. Reassemble and enjoy!
This really works, and makes the stock trigger feel great. You get none of the undesirable side effects of lighter connectors/springs, such as mushy break, weak reset, etc. It will take some luck, and trial and error, but for the cost of 3-4 trigger bars ($35-50), you get a GREAT trigger. If you get really lucky, you could do this for free if you have the tools. It cost me $24, since I messed up my first and second. I nailed it on the third.
Here are some pics:
These first two pictures are of the trigger bar hole. The first picture shows the modified bar on top of the stock bar. I know the cut off edge looks like crap, but I was anxious to test it, and you can't see it. It's fine like it is.

I forgot to take a picture before I cut off the end of the trigger bar (and the original hole), so I took this one. Stock is left, modified right. On the stock bar, you can see a mark where I started to drill a hole. I did that so you could see where to drill. It is about .130-.140" from the original (measure center to center). The heat discoloration is NOT from drill bit friction. It barely gets hot during drilling. That was from me heating it with a torch. My bits were dull, I was frustrated, my arms were tired, and I got desperate. It did nothing.
Here is the one that finally worked. The distance from the original hole (lower left hole) to the new hole (upper right) is about .130" measuring center to center.

The top one is the good one. The bottom is my original. Notice how my original was too far rearward, and too low. It pulled the trigger bar down too far, and would not deactivate the striker safety. Depending on where you drill the hole in the pad, you can get certain features. Further to the rear should reduce pre-travel, toward the front should reduce over-travel, etc.

Here's a shot of the right side of the pads. Again, the good one is on the top, original on bottom. It is hard to get the pin out without somewhat chewing up the plastic. I am going to fill the holes in with epoxy. Again, notice pin placement. One of the main problems with my original (bottom) was that my hole was not straight. It was lower on this side (right side), and the right side is more important since the trigger bar attaches on this side. Again, being so low prevented the striker safety from deactivating during the pull.

Here are all three pads. From bottom up, first, second and third. The top is the correct placement. The middle pad was too far forward, and the striker would not release. It was also too high, though that may not have been a problem. If you do this, just try to replicate the top one as best as possible.


